Image audit on Google Chrome
As the number of websites is getting considerably increased, the SEO principles and best practices are getting extended at the same time. Among these precise points, following the search engines’ image tips is one of the most important steps to improve your website performance and earn a better position on SERP (Search Engine Result Page). In this article, you will read about image audits which can help you test the website images from an optimization point of view.
Please note that the images may be seen by some users without following the rules below. However, from SEO and UX aspects and also considering different devices and browsers, it is highly recommended to follow these principles and audit solutions in order to provide best user experience and website performance.
In this article, you will read about:
- Comparing rendered image and original image aspect ratios
- How to check if there are images for devices with different Device Pixel Ratios
- How to test an image loaded correctly based on the DPR
- How to check modern image formats loading on Google Chrome
- How to test image scaling on Google Chrome
- How to test LCP image eager loading on Google Chrome
- How to test LCP image preload on Google Chrome
- How to check the image attributes on Google Chrome
Comparing rendered image and original image aspect ratios
Aspect Ratio is one of the important features of an image which describes the ratio of width and height of an image. If the aspect ratio of the rendered image differs from the original image, it will look unpleasant to the users. To check the aspect ratio of a rendered image and compare it with the original image on your Google Chrome, you can try one of the ways below:
Inspecting an image and hover on the image link to see aspect ratio
- Inspect an image by a right click on the image and clicking on Inspect element.
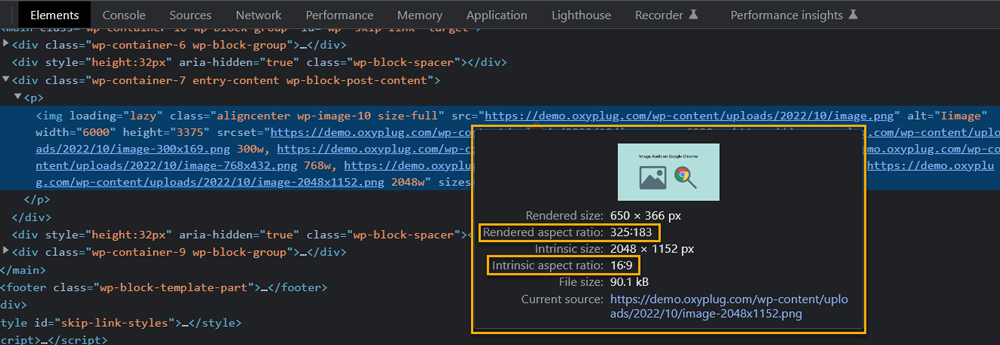
- In the opened Elements tab in DevTools, hover on the blue link of the image to see image previews.
- In the opened preview box, you will see the instinct and rendered aspect ratio.
How to check if there are images for devices with different Device Pixel Ratios
Serving images based on device pixel ratios is a good solution which brings a better user experience. For checking if a website serves images for different DPRs, you can right click on the image and choose the Inspect option. In DevTools, look for 1X, 1.5X, 2X, or 3X in the <img> tan. These DPR descriptors show that there are suitable image resolutions for different device densities.

How to test an image loaded correctly based on the DPR
Device Pixel Ratio (DPR) can be easily tested on Google Chrome to see what your device pixel ratio is and also you can check if the correct image based on your DPR is loaded or not.
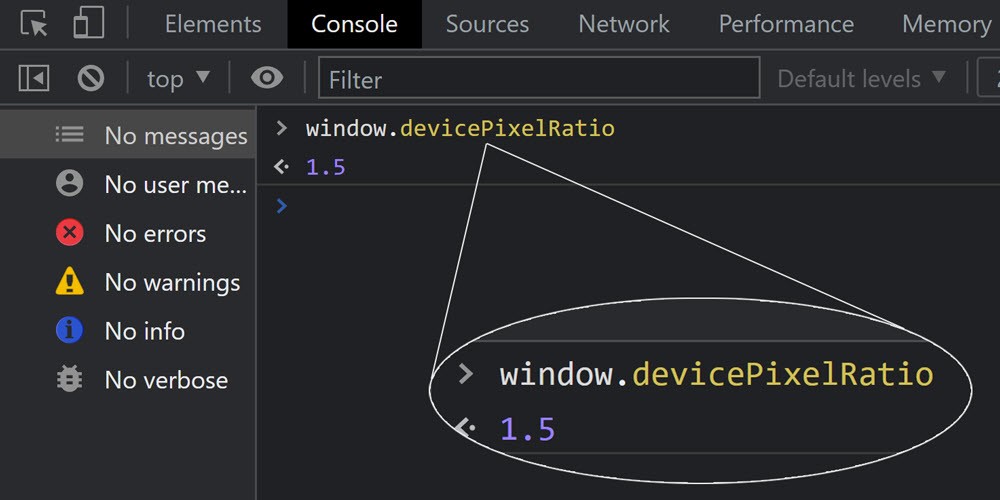
To start, you need to find out what your DPR is. You can type window.devicePixelRatio in the Console tab on your Google Chrome DevTools to see your DPR.
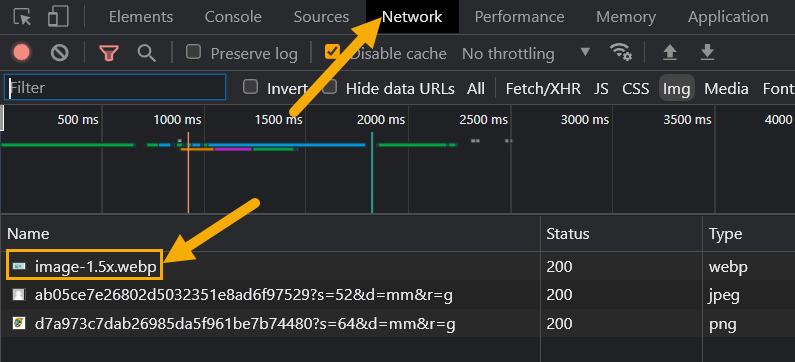
After finding out the device pixel ratio, open DevTools → Network tab → Img, then reload the page. You will see which image size and format is loaded on your display based on your device pixel ratio
How to check modern image formats loading on Google Chrome
Using modern image formats like AVIF and WebP is an effective solution to serve highly compressed images with less file size and higher quality. Although almost all browsers are trying to support these modern formats, there are still the ones which do not support these image formats, so it is recommended to consider non-modern format images such as PNG or JPG to be rendered as fallbacks.
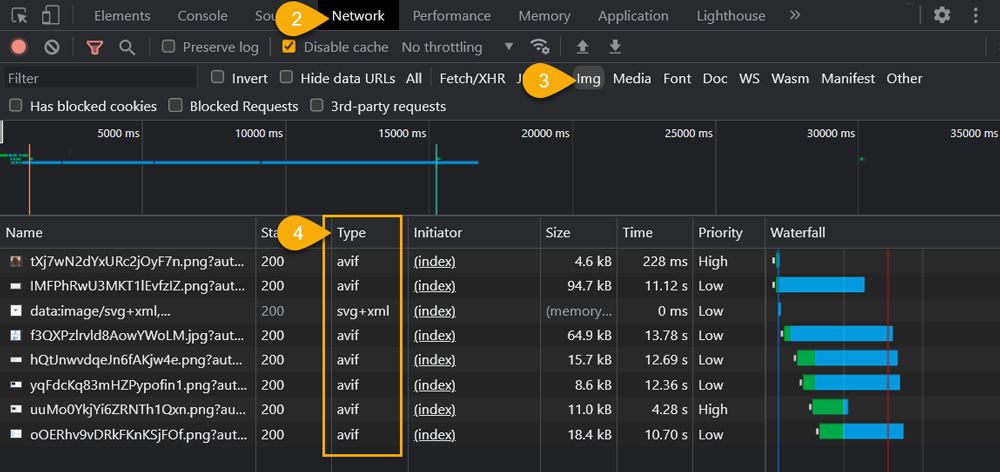
You can check all the image formats which are used on a page by following the steps below:
- Open Google Chrome DevTools by pressing F12, Command+Option+C in Mac or Control+Shift+C in Windows, Linux, and ChromeOS.
- Head over the Network tab.
- Select Img and reload the page to see a list of all images which exist on that page.
- On the Type column, check the image formats which are used on the page.
For checking whether the fallback images with non-modern formats are loading correctly on a webpage, you can follow the instruction below:
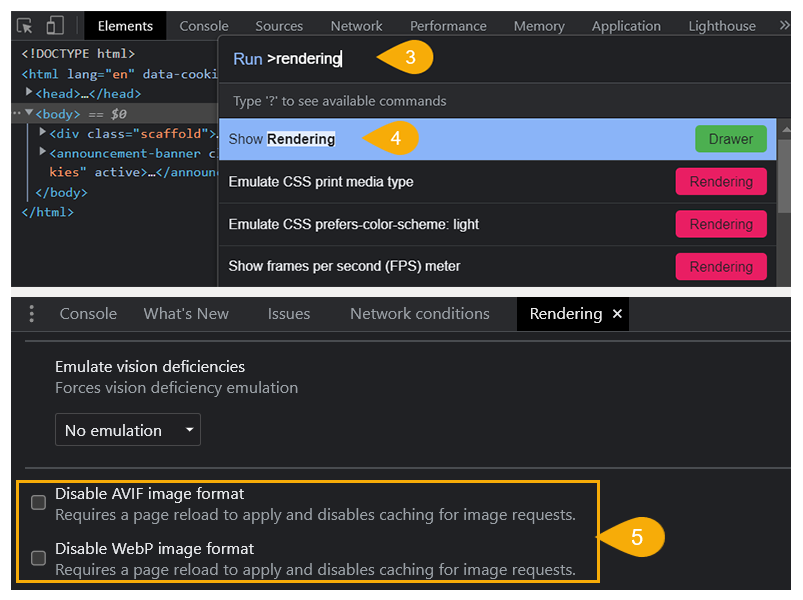
- Open Google Chrome DevTools as mentioned earlier.
- Open Chrome command menu by pressing Command+Shift+P (Mac) or Control+Shift+P (Windows, Linux, ChromeOS).
- Type Rendering in the opened window.
- Select Show Rendering.
- In the Rendering menu which is now visible on the bottom of DevTools, select Disable AVIF image format (you can do the same for WebP images).
- Reload the page to see whether the fallback image is loaded or not.
How to test image scaling on Google Chrome
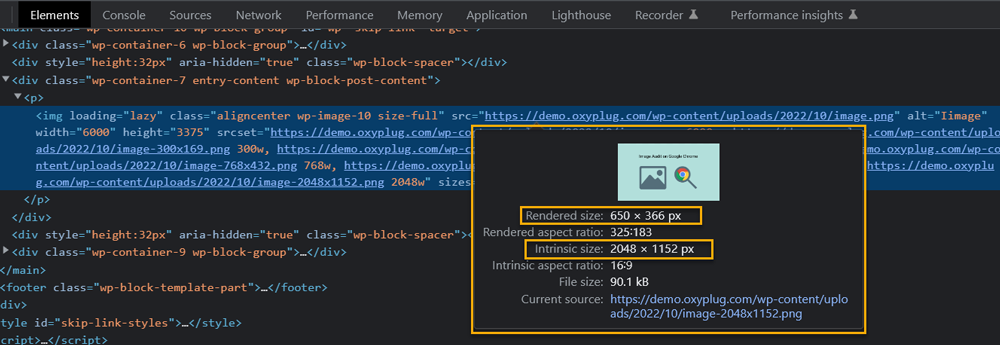
One of the image critical issues is to load big images, but show them in smaller dimensions. It is of great importance to load the exact image dimension as the rendered dimensions.
For testing image scaling on Google Chrome, you can inspect an image (doing a right click and selecting Inspect) on the web page. On the Elements tab, you can see the inspected image in a <img> tag. By hovering on the image’s link, a preview box will be opened which shows the real size and rendered size of the image.
How to test LCP image eager loading on Google Chrome
Eager loading concept is to load images with the high priority as soon as possible without considering if they are above-the-fold or are just offscreen. To have this feature, the image attribute loading=”eager” should be defined in <img> tag. To check if there is loading=”eager” attribute in <img> tag, inspect a LCP image on your Google Chrome browser by right clicking on the image and selecting Inspect element. On the DevTools window, look for the <img> tag, then you can find the eager loading attribute if it exists.

How to make sure the LCP image is not lazy loaded on Google Chrome
One critical issue in long LCP (Largest Contentful Paint) timing is to lazy load hero images. It is highly recommended not to use loading=”lazy” for LCP images or JavaScript to lazy load images in the viewport.
loading=”lazy”
To check if your above-the-fold image is lazy loaded or not, you can inspect the image by doing a right click on the image and selecting Inspect element. On DevTools, look for the featured image <img> tag and check if there is loading=”lazy” or not. Sometimes, for lazy loading images, JavaScript is used.

Lazy loading images by JavaScript
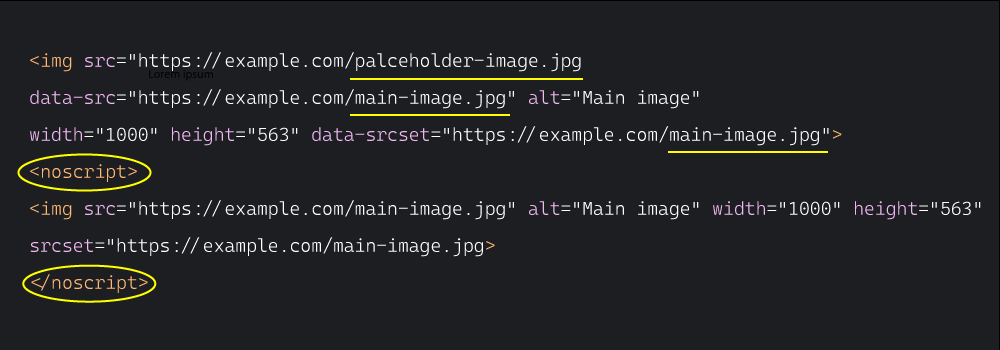
Another way for lazy loading the images is by using JavaScript methods. For checking if the LCP image is lazy loaded by JavaScript or not, you can check the image source. In most JavaScript lazy loading techniques, the original image source (src) is replaced with a placeholder, then a <noscript> tag will be added after the <img> tag in which the main image src (source) is located. By user scrolling or page loading (it depends), the image source in placeholder will be replaced with the main image source in <noscript> tag.
How to check if below the fold images are lazy loaded or not
Despite avoiding lazy loading LCP images, lazy loading is a very good technique for the below-the-fold images which need scrolling and cannot be seen exactly after loading a website page, so it can increase the website performance.
For testing whether the other images of a page are lazy loaded or not, you can follow the two ways below.
First way:
- Inspect an image (not LCP image) by right clicking on the image and selecting ‘Inspect’.
- In DevTools, search for the loading=”lazy” in the <img> tag.
Second way:
- Open DevTools by pressing F12, Control+Shift+C in Windows, Linux, and ChromeOS or Command+Option+C in Mac.
- In the DevTools environment, go to the Network tab.
- Select Img.
- Scroll down to see if the new images are loaded on the page or not. If the new images are loaded, it means they are using lazy load technique for below-the-fold images.
How to test LCP image preload on Google Chrome
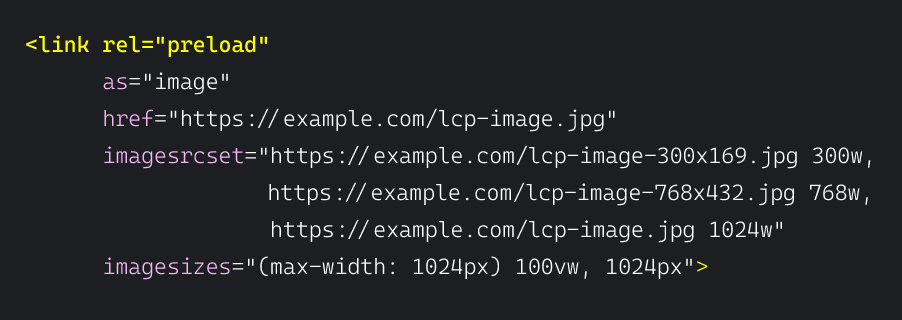
Preloading the Largest Contentful Paint image is a great solution for a better web page performance and faster page loading. By preloading an LCP image, the browser understands the image is a top priority to be downloaded. For checking if a resource is preloaded on Google Chrome, press Ctrl + U or right click on the page and select ‘View page source’. On the opened window, look for <link rel=”preload”>.
How to check the image attributes on Google Chrome
From an SEO aspect, images on web pages must have some attributes such as alt, width, and height to help the browsers render them correctly according to their width and height and also the search engines understand what the image is about based on their alt attribute. For checking the existence of these image attributes, you can easily inspect an image of a page by right clicking on the image and selecting ‘Inspect’ option. On the opened DevTools, in the <img> tag, the image attributes can be seen. If an image does not have an attribute like Alt, it will look empty: alt=” ”.

From an SEO point of view, if the browser knows one of the image dimensions such as width or height, it can calculate the other dimension and render the image correctly. To do that, we can let the browser know the width and height aspect ratio. Here is an example in which the aspect-ratio of an image is defined by the style below (the numbers in style below are not fixed and are mentioned as examples):
.product-img {aspect-ratio: 145/133;}
The numbers which are separated with a ‘/’ are width and height ratio values, so the container will adjust the image based on these ratio values. Please note that if the numbers which are used as ratio values, follow divisibility rule, they can be simplified, so we can use ⅕ instead of 10/50.
Conclusion
Images are one of the most important parts of a web page which can simplify the content of the page to the user and also, they are effective in attracting users’ attention to stay more on the page. In this article, we have tried to cover the easiest way to check your images on the Google Chrome browser from different SEO aspects to see if the important SEO rules and best practices for images including but not only image attributes, lazy and eager loading, and image scaling have been respected or not.